
Create and Manage Projects
Projects hold everything for one job — set them up well and the rest follows.
A project is one job or site: it contains spec sheets, areas, floor plans, files, revisions, and comments. Projects belong to your workspace, so every member can see them according to their role.
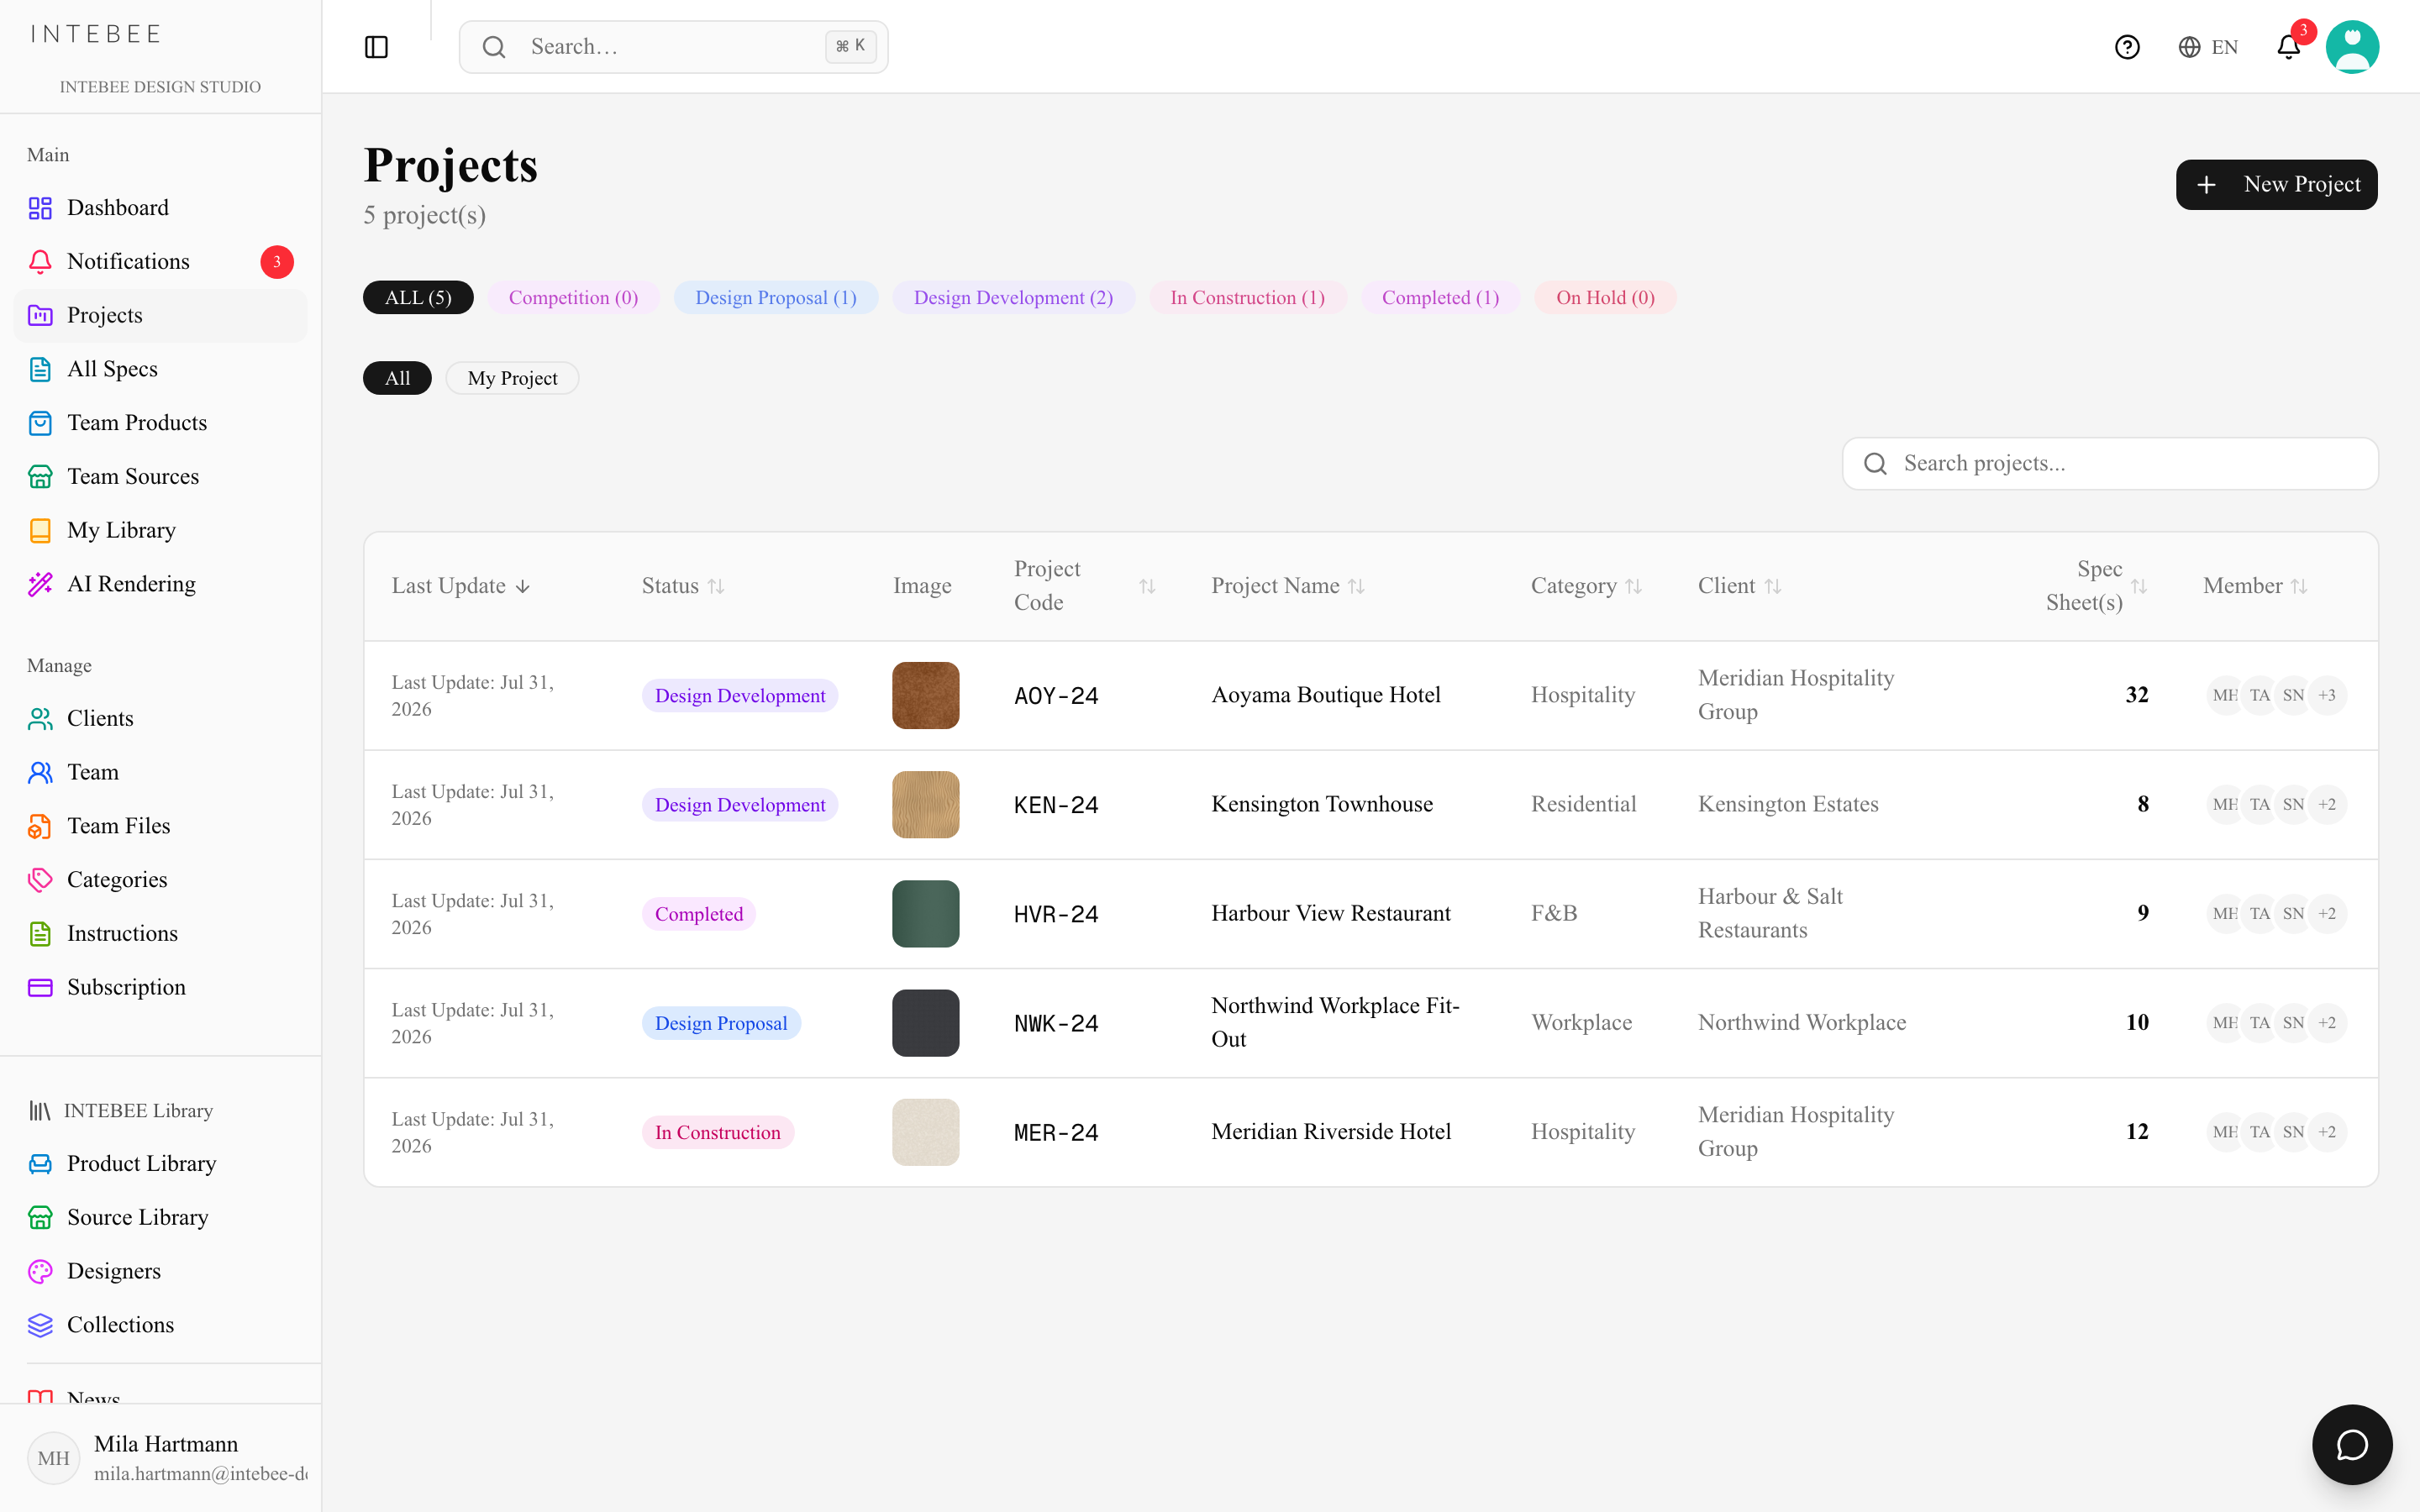
Finding a project
The Projects page lists every live project in the workspace. The filter card above the list narrows it:
- Search projects... — matches the project name, project code, description, client and category as you type.
- ALL / My Project — every project, or only your own: the projects you are a member of or created. Whoever creates a project becomes a member of it automatically.
- Status — one dropdown with a checkbox per project status and how many projects carry it. Tick one status to see only that status, tick several to see them together, and tick All to clear the filter. Not set collects the projects with no status yet, so the counts add up to All. Statuses that count 0 are hidden unless they are ticked, and Search statuses... at the top of the list narrows a long list of statuses (No matching status when nothing fits).
Each ticked status appears under the card as a token with its count: click its x to drop that one, or Clear status to drop them all. The scope and the ticked statuses stay in the page address and survive re-sorting, so you can bookmark a filtered list or send it to a teammate; the search text does not. The Spec Sheet(s) column shows how many spec sheets each project holds.
While My Project or a status is selected, the count under the page title reads N of M project(s) — the projects that match, out of all of them. Projects other teams have shared with you as an external collaborator are listed below, under Shared with me (N).
Creating a project
- Open Projects → New Project.
- Fill in the details — everything except the name is optional and editable later:
- Project Name and Project Code (the code appears on documents and exports).
- Category and Status — from your workspace's pick-lists.
- Client — link a client from your directory, or type a new name and it is created with the project.
- Address, Country, Currency — used on documents and for pricing display. Prices in the spec list, the print views and Word exports carry the currency's symbol — €1,234.50, £1,234.50, ¥1,235 (the yen has no decimals); the symbol is the same one the currency picker shows, so other dollars and the yuan are never mistaken for US dollars or yen — CN¥, HK$, A$, S$, ฿ (THB), RM (MYR), CA$. The currency is saved per project; new projects start without one, which prints as US dollars. You can choose from 11 currencies: USD, EUR, GBP, JPY, CNY, HKD, AUD, SGD, THB, MYR, CAD.
- Schedule — start and end dates (years 1900–2200).
- Project Images — a main image plus up to three sub images. Large photos are resized to 2,560 px on the long side and compressed before they upload, and the project list loads a small preview instead of the full photo.
- Languages and Code Settings are on the same form, pre-filled from your workspace defaults. You can accept them and move on, or set this project's Spec Sheet Primary Language, second language, Item Code Logic, zero-fill, Dimension Unit, Default Sort and Print Template before the first sheet exists. All of them are editable later in Project Settings. If you switch the second language on, choose the language as well (or have a team default second language) — a project is not created with the switch on and no language.
- Click Create Project.
The name is required — spaces alone do not count. If another project already uses the same Project Code (upper and lower case are treated alike), the form asks before creating: "The project code "…" is already used by "…". Create another project with the same code?" — Create anyway keeps both, or change the code. An end date before the start date is flagged with "The end date is before the start date." but not blocked. The button reads Creating… while it works, so a double click creates one project, not two.
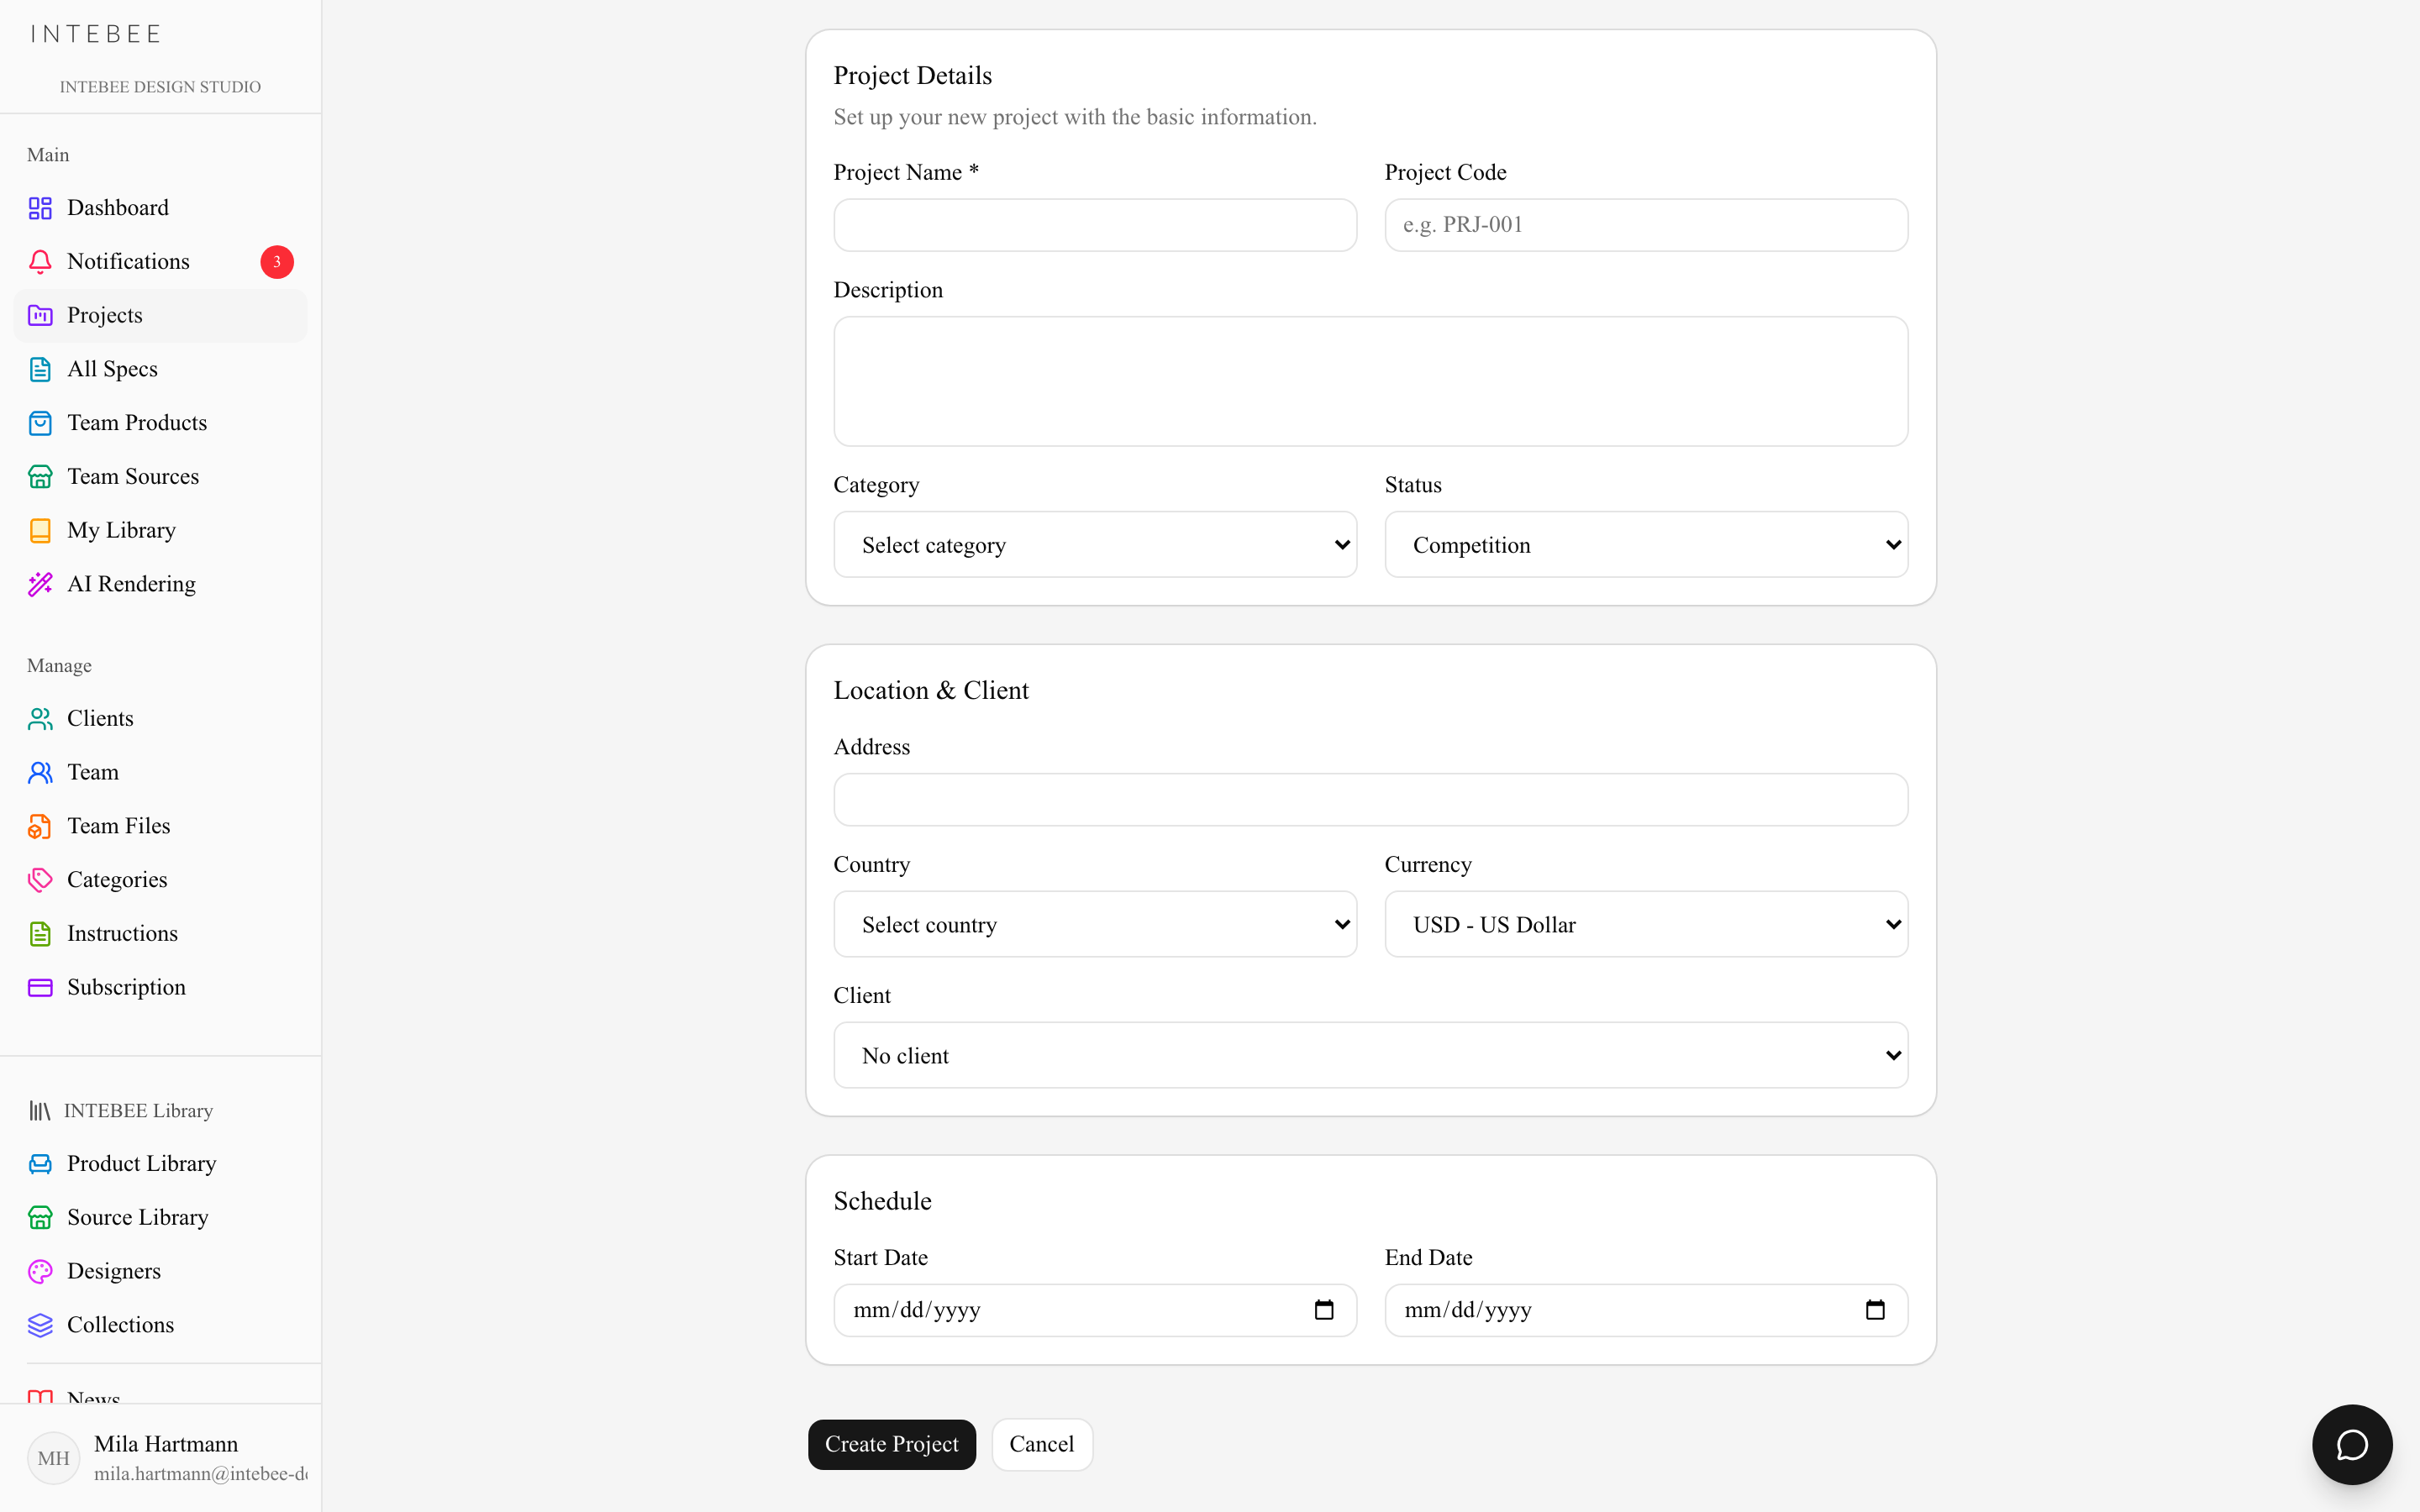
Project Name can be up to 200 characters and Project Code up to 50; longer text stops at the limit. A missing or invalid field is pointed out in your interface language. If you switched to another workspace in a different browser tab after opening this form, Create Project is refused with "Your active workspace was changed in another tab. Reload this page, then try again." — so a project never lands in a workspace the page doesn't show.
Plan limits
Creating projects is limited by your plan — the limit is enforced when you create, never by deleting existing work. Two separate caps apply: a total, and a number of new projects per calendar month.
| Plan | Projects in total | New projects / month |
|---|---|---|
| Free | 1 | — |
| Personal | Unlimited | 3 |
| Atelier | Unlimited | Unlimited |
| Studio | Unlimited | Unlimited |
Hit a cap and the form is refused with "Plan limit reached: your {plan} plan allows up to {limit} projects. Upgrade your plan to add more." On the Free plan the total is reached the moment you have one project, so the New Project button on the Projects page becomes a disabled Upgrade plan to add projects.
The project page
Each project has tabs for its contents:
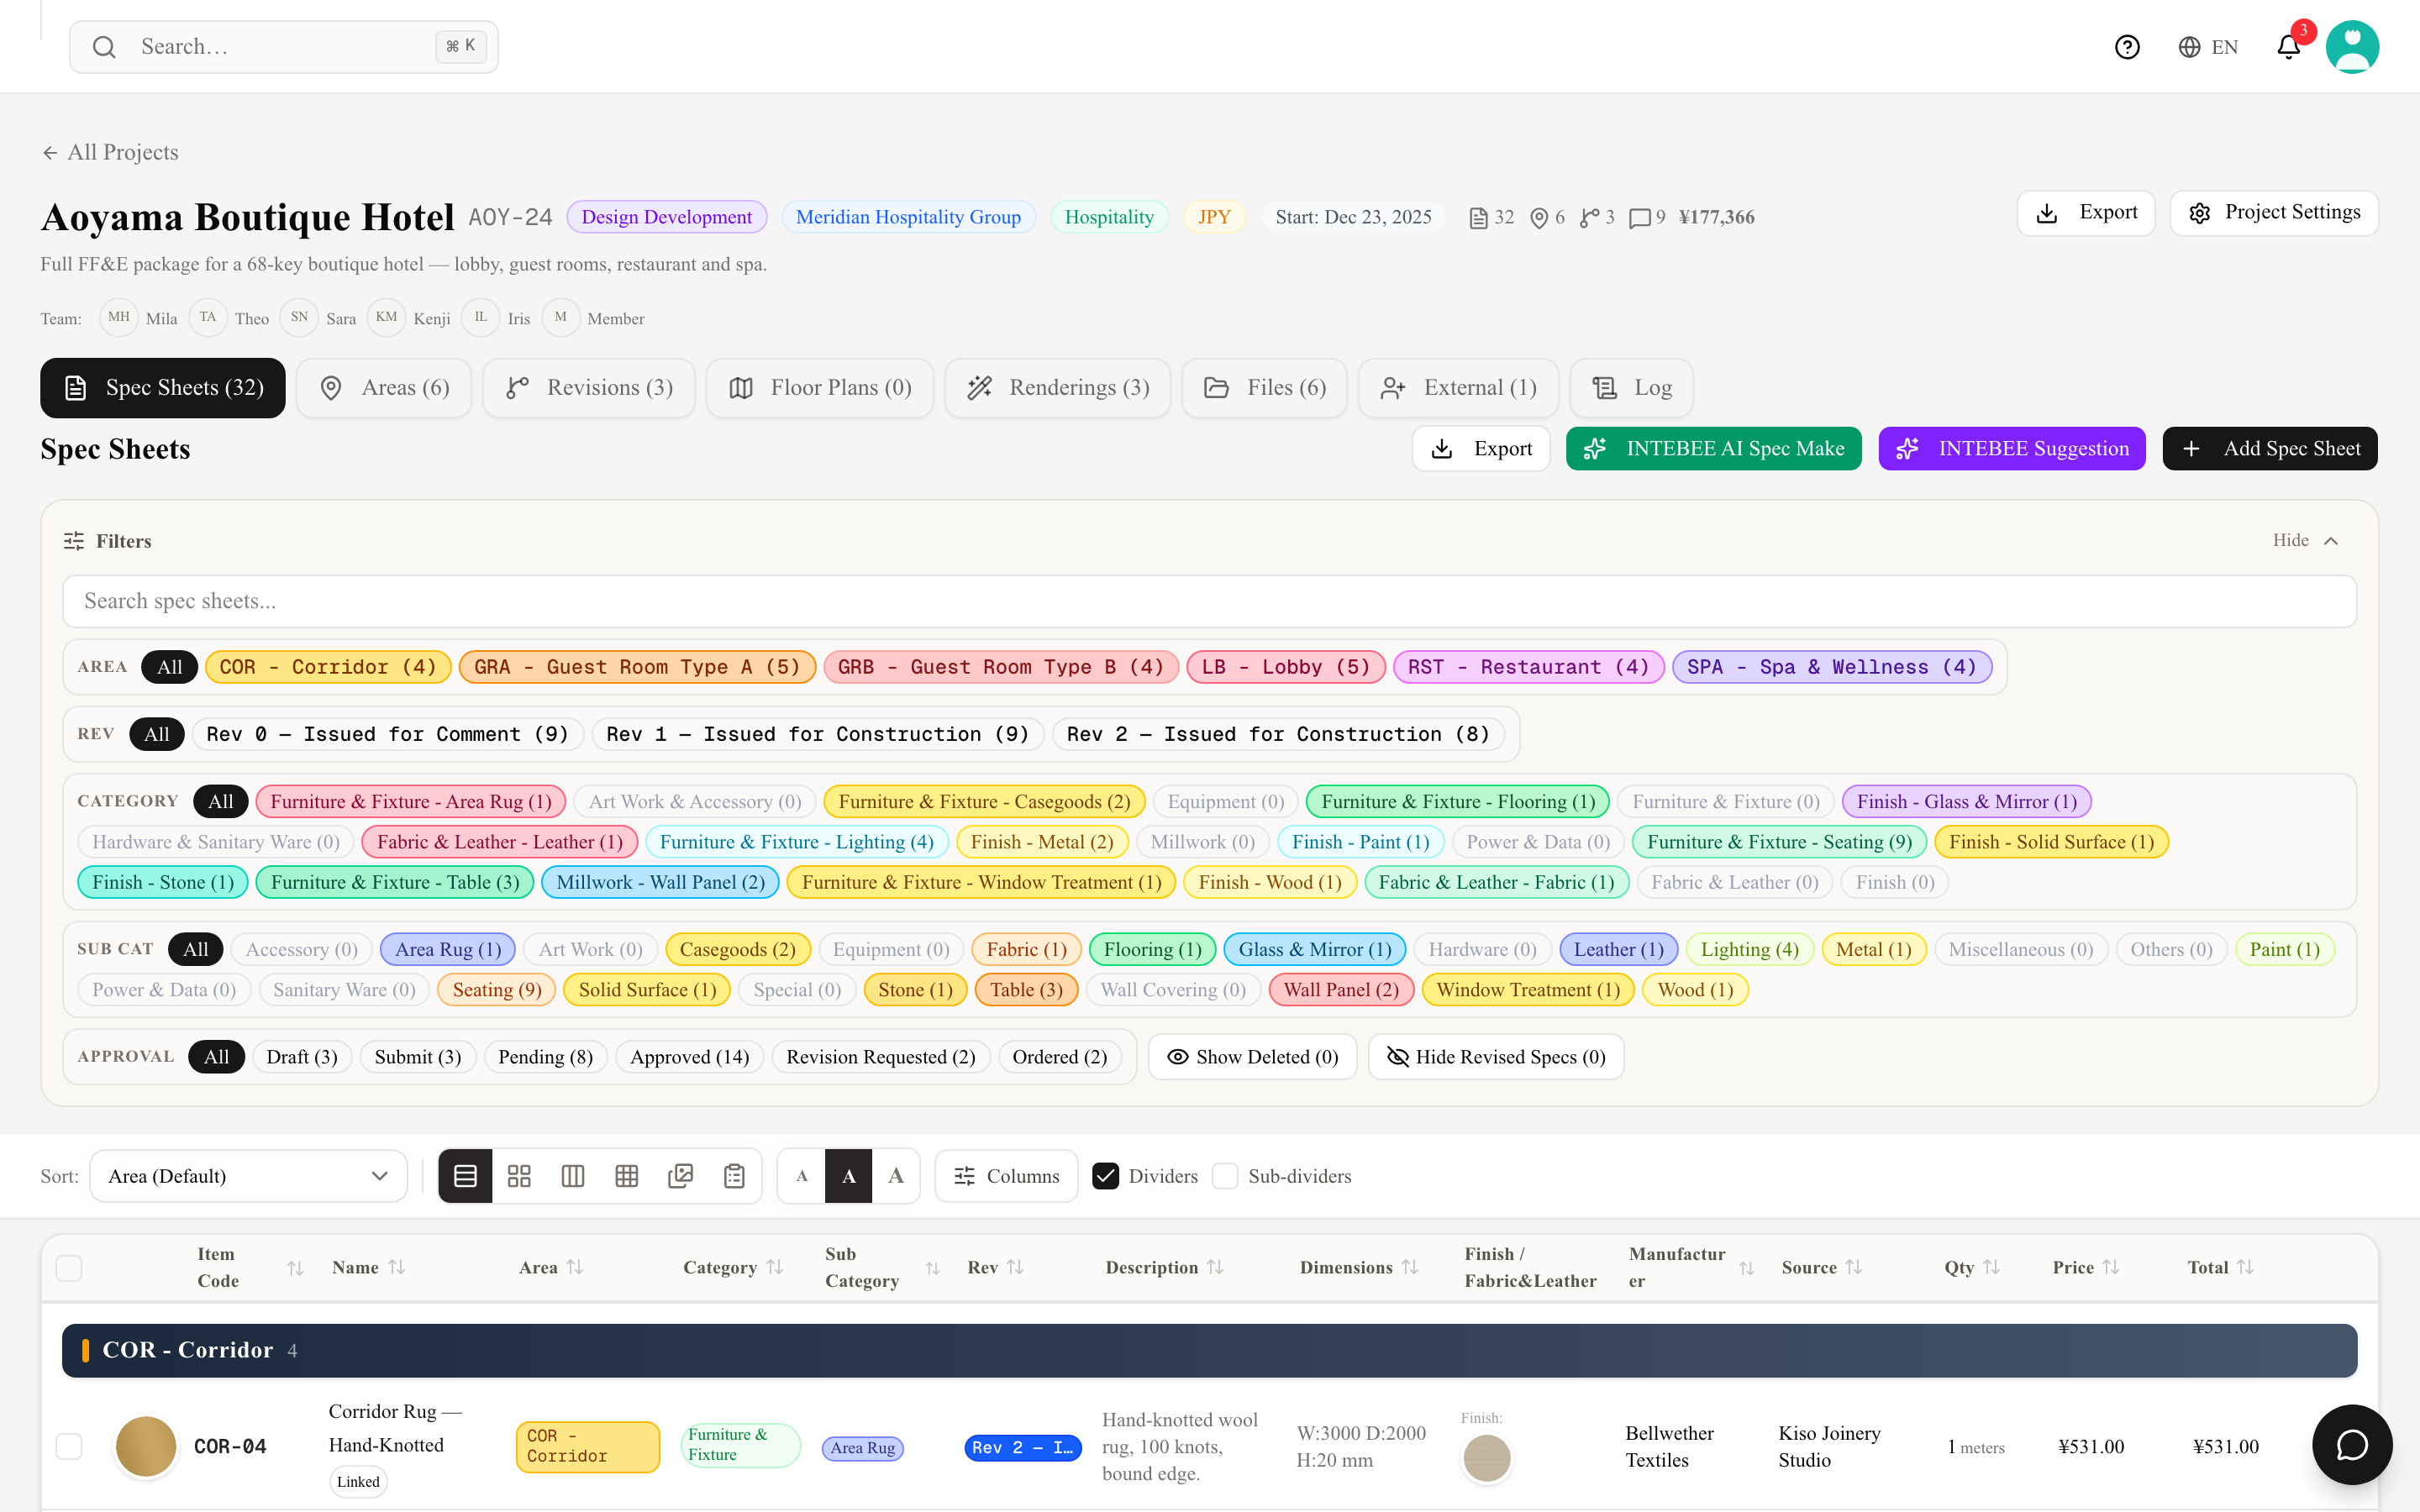
- Spec Sheets — the specification documents (the heart of the project).
- Areas — locations used to group sheets and drive item codes.
- Revisions — each issue of the document set (see Revisions, statuses & client approval).
- Floor Plans — the plan editor (see Floor plan editor basics).
- Renderings — the AI renderings linked to this project (see AI Rendering).
- Files — project-scoped file sharing.
- External — external collaborators for this specific project.
- Log — the activity history (see Project activity log).
Export sits in the project header, beside Project Settings. See Print templates and PDF export.
Project settings
Open Project Settings to change how this project behaves. Every field saves as you leave it — a Saving… / Saved badge in the top right tells you where you are. There is no Save button.
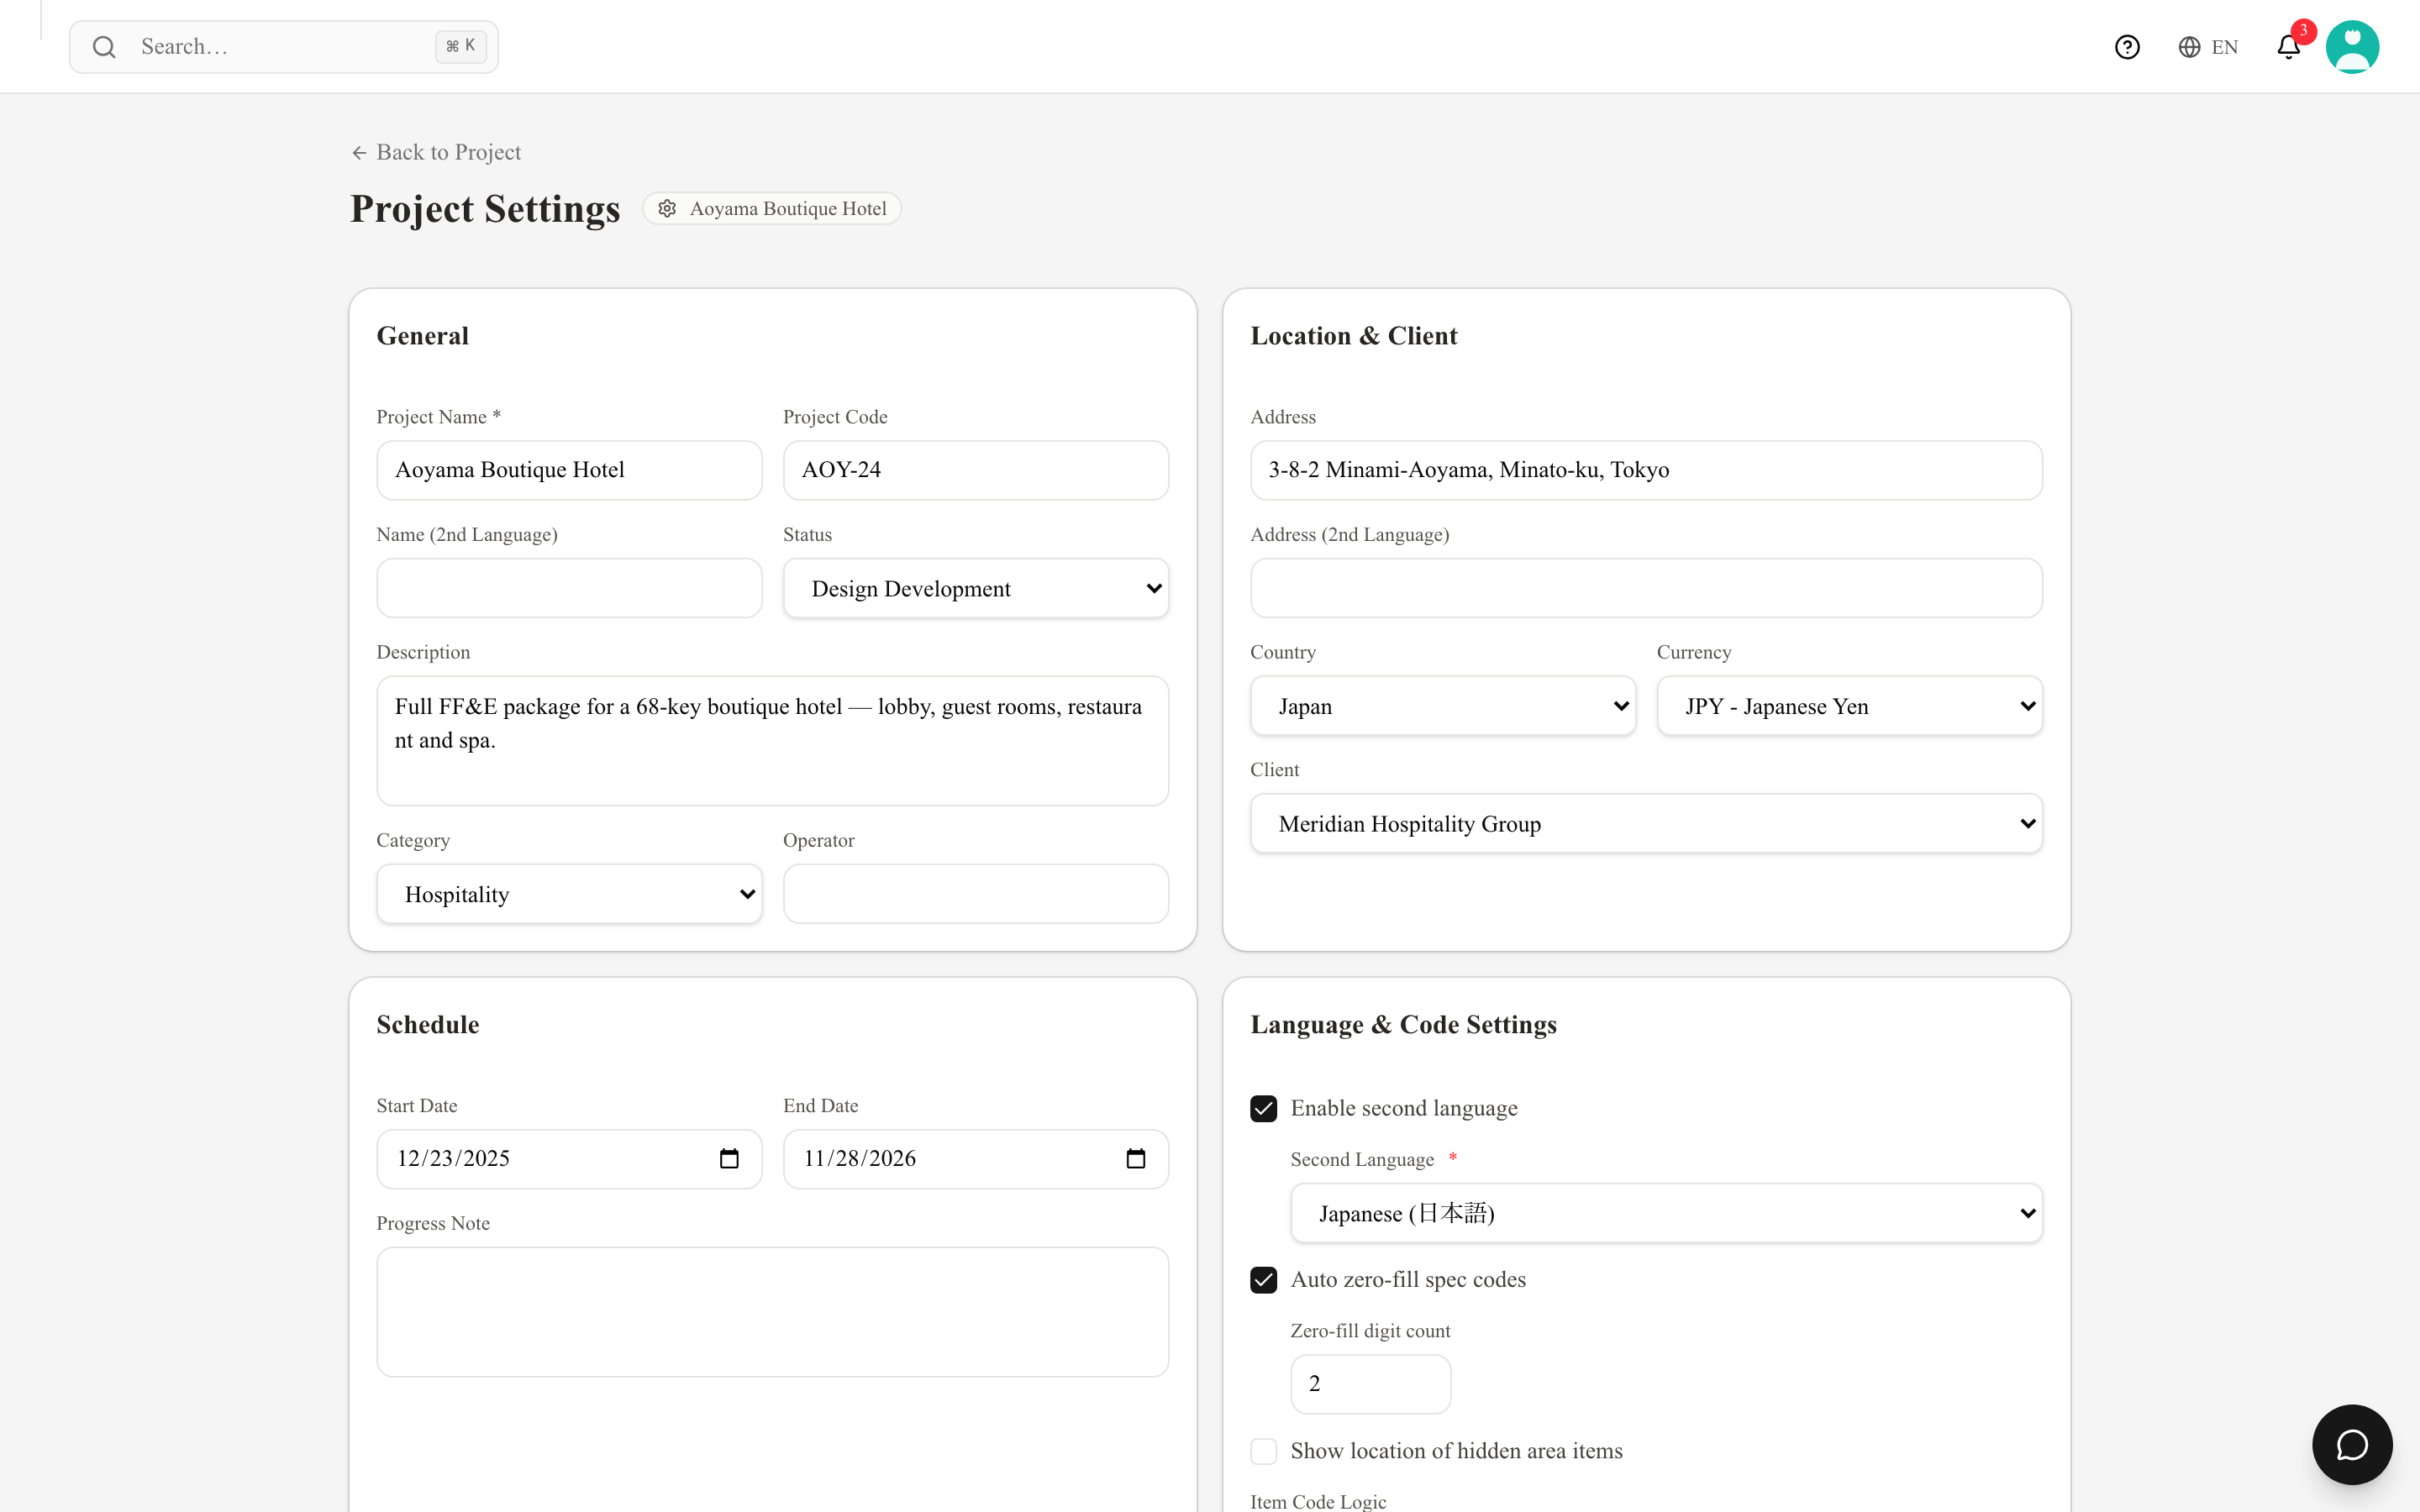
General — Project Name, Project Code, Name (2nd Language), Status, Description, Category and Operator (the hotel operator or facility manager, when that differs from the client).
Location & Client — Address, Address (2nd Language), Country, Currency and Client.
Schedule — Start Date, End Date and a Progress Note for where the job currently stands.
Code Settings — the mechanics of this project's numbering:
- Auto zero-fill spec codes and the Zero-fill digit count —
LB-001instead ofLB-1. This is a project setting; the team default it started from lives in Settings → General → Item Codes. - Show location of hidden area items — prints the location of items whose area is hidden.
- Item Code Logic — Area + Number + Category, its (Alt) variant, Category + Number, Number + Category, Area + Number, Number Only and Manual. Every option shows a live example for an item with an area and one without, and the team's default carries a Team default badge. See Areas and item codes.
- Regenerate All Item Codes — renumbers every sheet in the project to match the current logic. Changing the logic or the zero-fill setting triggers it automatically. Treat it as destructive: contractors quote the old codes, so do it before you issue, never after. Protected item codes (sheets brought over from the previous system, until you unlock them) and codes that carry no number are left as they are.
- Dimension Unit — mm, cm, m, inch or ft. New spec sheets start in this unit, and AI Spec Make reports sizes in it.
- Default Sort — the order the Spec Sheets tab opens in for anyone who has not picked a sort of their own in this project: Area, Item Code, Area → Category, Category, Sub Category, Manufacturer or Approval Status, each with the same icon as in the list's Sort menu. The team's default carries a Team default badge; choosing it makes the project follow the team setting (Settings → General → Default spec sheet sort), including later changes to it. A sort someone picks in this project's Sort menu still wins for them, in this project only — see Spec sheet basics.
- Print Template — this project's default sheet template: INTEBEE Standard, Large Image or Large Image (Left Align).
Spec Sheet Language — Spec Sheet Primary Language, plus Enable second language and the second language itself (required once enabled). The primary language inherits from the team default when left blank, and product category names follow it; the second language is what gives every text field its paired second-language input, and it is a Studio plan feature.
Project Images (a main image plus up to three sub images) sits in the same grid, and a Danger Zone with Delete Project closes the page.
Cover pages, tables of contents and section dividers are not project settings — you choose them in the Export dialog, and your team's starting values for them live in Settings → Templates → Export Layouts.
Archiving and deleting
Deleting a project is a soft delete: it disappears from every list, but nothing in it is erased. Delete Project in the Danger Zone asks for confirmation first, and only a team Admin or Manager, or the person who created the project, can use it — for anyone else the button is disabled with "Only a manager or the person who created this project can delete it." (a project with no recorded creator can be deleted by managers only). Managers find deleted projects under Deleted projects at the bottom of the Projects list, where Restore brings a project back with everything it held; a restore counts against your plan's project limit like a new project. Use project status (e.g. Completed, On Hold) for day-to-day lifecycle management instead of deleting.
The Delete Project confirmation lists what goes with the project: the number of spec sheets, floor plans and project files it holds.